1-800-221-9425 | Call the Aircraft Parts Experts
Home/Firewall Forward Parts/Batteries/EarthX Batteries/Amber LED Press to Test indicator

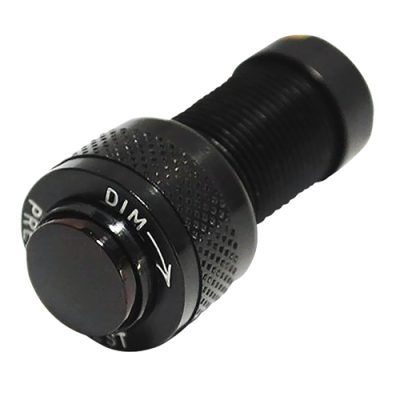
Amber LED Press to Test indicator

Out of Stock

$89.00

Press to Test indicator features a dimming actuator, LED replaceable lamp, and an amber lens.

Military grade panel mount indicator meets or exceeds military specification MIL-L-3661B with high quality black anodized aluminum housing.

The 12V LED is easy to installation and compatible with a 10-15V electrical system. If you do not have an EFIS to connect to, this is a required indicator light if installing in a certified aircraft along with the ETX900-TSO battery.  Details installation directions are located in the EarthX manual but it is very simple. To install, connect red wire to a positive bus connection, connect the black wire to fault monitoring wire (also black) that is located on the EarthX battery.

Specifications:

  • Color: Amber
  • Voltage: 12V
  • Drill bit size: 15/32″

Kit includes:

  • Wire  20ga- 60″ in length
  • Mounting: Nut and Washer (included)
  • Replaceable LED lamp
SKU: PTTI Category:

Description

DESCRIPTION

The positive wire (red wire) of the LED should be connected to the electrical bus (12volt positive), typically to a fuse/breaker downstream of the master switch.  The negative of the LED (black wire) should be connected to the fault monitor wire (wire out the side of the battery) of the battery.

Step 1: install the 12V LED light thru a hole in your control panel.

Step 2: cut the black wire to length desired for your installation so the LED’s black wire reaches the battery.

Step 3: use a wire stripper to remove ¼” of the wire insulation so you can attach the “male” spade connector to the black wire. Crimp the male spade connector to black wire.

Step 4: plug the male spade connector into the end of the pigtail wire from the battery.

Step 5: connect the red wire to an electrical bus fuse/breaker (.25-1 AMP).  May have to untwist wire and cut to length.  Most of the time it is most convenient to connect to a fuse on the back side of the panel.  If not, it could also be connected directly to the positive terminal of the battery with a ¼” ring lug connector.


Q & A

Note: Wicks personnel are not certified aircraft mechanics and can only provide general support and ideas, which should not be relied upon wihout consulting a qualified technician. Wicks assumes no responsibility or liability for any issue or problem which may arise from any repair, modification or other work done from this knowledge base. Any product eligibility information provided here is based on general application guides and we recommend always referring to your specific aircraft parts manual, the parts manufacturer or consulting with a qualified mechanic.
There are no questions yet

Ask a question

Your question will be answered by a store representative or other customers.

Thank you for the question!

Your question has been received and will be answered soon. Please do not submit the same question again.

Error

Warning

An error occurred when saving your question. Please report it to the website administrator. Additional information:

Add an answer

Thank you for the answer!

Your answer has been received and will be published soon. Please do not submit the same answer again.

Error

Warning

An error occurred when saving your answer. Please report it to the website administrator. Additional information: